Student questions and our answers

to Live class enrollment/
checkout
to On-demand video &
product checkout

our classes

Legend:

in person class icon
Live in-person

zoom class icon
Live via Zoom

video class icon
On-demand video

List of all classes

Luminous Works students leave our classes with more than pleasant memories.

Besides the class files they build, students also receive other resources including an invitation to write the instructor with questions. Since many of you may benefit from the answers we've supplied over the years, we built this page as yet another resource. It will grow as new questions arrive in our inboxes and old ones get added as we review them.

But why wait for us? You can have most of your questions answered with...

The Course & Compendium Series

Written by our instructors Steve Laskevitch, Jason Hoppe, and Ben Goldsmith and published by Rocky Nook, each book in the series contains a full course and a comprehensive reference. The step-by-step lessons, based on Luminous Works' curriculum, cover features in practical contexts and demonstrate best practices and workflows. After the Course, the Compendium will serve for years as a trusted reference.

They contain answers to a great many questions. Check 'em out!

your local bookseller may have them for you!

Adobe InDesign CC: A Complete Course and Compendium of Features

Buy Now:
KindleApple BooksPrint

Your guide to building publications in InDesign. Just like his InDesign classes, Steve's book teaches you the procedures needed to professionally create engineering proposals, marketing collateral, newsletters, books, and more.

Adobe Illustrator: A Complete Course and Compendium of Features

Buy Now:
KindleApple BooksPrint

Our friend Jason Hoppe's book takes you from the basics through strategizing the creation of sophisticated infographics. It's also a great complement to and follow-on resource for our Illustrator classes.

Adobe Photoshop: A Complete Course and Compendium of Features 2nd Edition

Buy Now:
KindleApple BooksPrint

Steve’s fully updated guide to editing images and creating designs in Photoshop. Like our Photoshop classes, you'll start with basic color correction and retouching and advance through advanced composite images and more. This second edition includes the newest refinements to the user interface and touches on the rapidly-changing world of generative AI.

Adobe Premiere Pro: A Complete Course and Compendium of Features

Buy Now:
KindleApple BooksPrint

Ben Goldsmith’s new book allows you to tell your story. Like Ben's Premiere Pro classes at Luminous Works, his book is a full curriculum from the basics of video editing through advanced and practical techniques and has a comprehensive reference as well.

Both the print and electronic versions include a FREE addendum for the 2022 release!

Adobe After Effects: A Complete Course and Compendium of Features

Buy Now:
KindleApple BooksPrint

Ben Goldsmith walks you through animating text or objects, changing a scene’s setting, or creating a 3D scene and more in this mammoth app.

Adobe Lightroom: A Complete Course and Compendium of Features

Buy Now:
KindleApple BooksPrint

Writer and photographer Jeff Carlson guides you from keywording your most recent shoot to organizing your photo library and developing and printing your best five-star images.

Choose one or more topic(s) to reveal questions and answers (or Show All):

PsAiId3dGeneral How do I make swatches persistent for every new illustrator file?

Create a document (as blank as you’d like), then either create swatches or use the Swatches panel menu > Open Swatch Library > Other Library… and navigate to a doc that has swatches you’d like.

Add any other content you’d like to be in your default doc.

Then Save As choosing Illustrator Template as the File type/format. Any doc you make from that will be new and unsaved so you don’t have to worry about saving over the original template. Do worry about losing it.

Another option is to create a New Document Profile. This requires saving a regular Illustrator file, set up as above, to a special place in the operating system. To use it, you have to use the old ("legacy") New Document dialog box to choose it.

Where to save that file:

on Windows: Find your way to C:\Documents and Settings\[User]\Application Data\Adobe\Adobe Illustrator [version]\[en_US or your language]\New Document Profiles

on macOS: In the Finder, hold down the option key and use the Go menu to choose Library. Then...
Application Support/Adobe/Adobe Illustrator [version]/[en_US or your language]/New Document Profiles

To use that profile, you need to use the old New Document dialog box. In Illustrator, use the General Preferences to check Use legacy “File New” interface. Then, every time you make a new doc, you'll have the Document Profiles menu to choose yours.

Frankly, I'd just make a template, but many may find the New Document Profile advantageous.

PsAiId3dGeneral How do I quickly apply a color to many shape layers?

Group the layers then apply a Color Overlay effect to the Group (like on page 202 of the Photoshop book). If the layers can't be contiguous in the Layers panel, however, you can apply the effect to one first. Then right click near the name of the layer, choosing Copy Layer Style. Then highlight all the other shape layers, right-click near the name of one of them, then choose Paste Layer Style.

PsAiId3dGeneral How can I create a graphic with strokes that are "knocked out" (not white)?

Illustrator makes this a touch difficult. However, I usually use a feature called Live Paint to separate strokes from the fills for the graphic(s). That is, we select the graphic, convert it to a Live Paint Group (Object > Live Paint > Make) then immediately use Object > Live Paint > Expand.

This yields two groups (grouped together): one is a set of paths with only strokes, the other only fills without strokes.

After ungrouping, I use Object > Path > Outline Stroke (making the stroked lines into filled shapes that can be used in the next step).

Then I use a Pathfinder operation called Merge to fuse the former strokes into a single path. It also removes the parts of the fills that underlapped other shapes.

Finally, I delete shapes formerly known as stroked lines.

Tedious? YES! So I recorded an Action in Illustrator to make this a lot faster. [This is a frustrating task since so many functions in Illustrator can't be recorded.] Download that action here, if you like. Use the Actions panel menu to Load Actions..., installing it.

To run it successfully, make sure the artwork is not grouped but selected. It also needs to have one stroke color used (the one that will vanish like below). The action hides your original art and creates a knockout stroke version on its own layer.

PsAiId3dGeneral How do I get consistent spacing between an image and a caption below it?

What I do: I create some top-inset on the caption's text frame (right-click the frame and choose Text Frame Options, then sever the link between the 4 sides so you can choose the desired space for top inset only).

When you move the text frame so its top approaches the bottom edge of the image frame, it'll gently snap on. Now, the text is a known distance from that image. Do the same for all the other captions. This is precisely the technique I mention on page 203 of the InDesign book.

TIP: use an Object Style to "record" the inset setting and to apply it easily later.

PsAiId3dGeneral How do I share Adobe Camera Raw presets with my coworkers?

ACR allows the export and import of preset groups. So, to share your unique presets, you'll have to create a group to put them in. In the Presets tab of ACR, create a new preset you may wish to share, give it a name and specify New Group...:

Give it a name, too. If you’ve already got some presets to share, you can right-click them choosing to move them to the new group you made.

Right-click on the group that has all the sharable presets and choose Export Preset Group.... That creates a zip you send to the others.

A recipient goes to their Presets tab and clicks the ellipsis (. . .) at the top, then chooses Import Profiles & Presets selecting the zip file you sent them.

There's a whole chapter on ACR in the Photoshop book. Just sayin'.

PsAiId3dGeneral When I adjust a Paragraph Style's leading, I get no change or huge gaps. Why?

It's likely someone enabled the dreaded Baseline Grid. It's used when an InDesign user can't be bothered to figure out the leading they need. Right-click each Paragraph Style and choose Edit "stylename".... Go to Indents and Spacing and set Align to Grid to None and never look back.
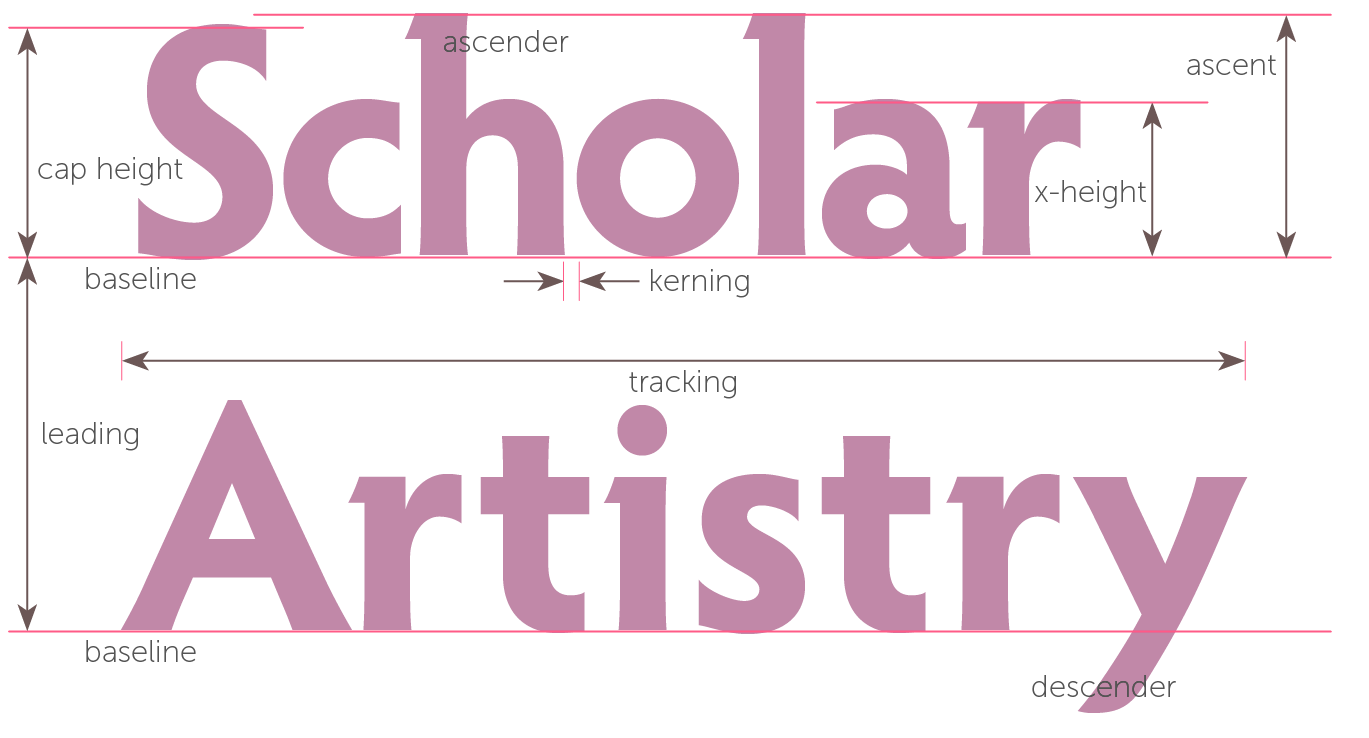
A reminder of what leading and its friends are:

PsAiId3dGeneral Why is Photoshop having trouble stitching my panorama?

[Student attached photos of a modern bridge at night]. With minimal, slender content to compare from frame to frame, you should probably overlap your shots more. In general, I like to overlap each frame of a future pano by about a third. In the case of images with open or night sky and few details, you may need many more frames, overlapping a great deal.

If you're considering many panoramas shot at night, you can make it easier on Photoshop by pivoting the camera around the lens' entrance pupil (sometimes misnamed "nodal point" which is something else). When the camera/lens is rotated around that point, there is no parallax—foreground and background objects don't shift relative to each other in the viewfinder.

One can buy either inexpensive or very expensive hardware to help with this (buyer beware! These links aren't endorsements). Once the camera is mounted on such, the process to find the "no-parallax point" is easy, if tedious.

Still, even without those efforts, Photoshop can do wonders if you give it enough to chew on. Try that before spending the big bucks!

PsAiId3dGeneral What's the fastest way to supply styles from our style guide to my team?

I love this question. Copy & Paste!

Create an InDesign doc whose content uses all the styles you'd like your team to access: text frames with short paragraphs using your Paragraph styles, with Character Styles applied to words here and there. Create other frames with Object styles applied to them, too. Be sure to use all the swatches you'd like to share as well. You can make those frames as small as you like, even allowing the text to overset.

Then select it all and group it, making it easy for a user to copy the whole bundle.

Just supply that doc to you team (on a server, e.g.). Each team member needs only open it, copy that group then paste it into a new document which will then get all of those styles and swatches! Then simply delete the pasted group and the styles will stay behind.

PsAiId3dGeneral For a map, I need a clean way to show railroad tracks, but showing the rails and ties. Can I do this with a single stroked path?

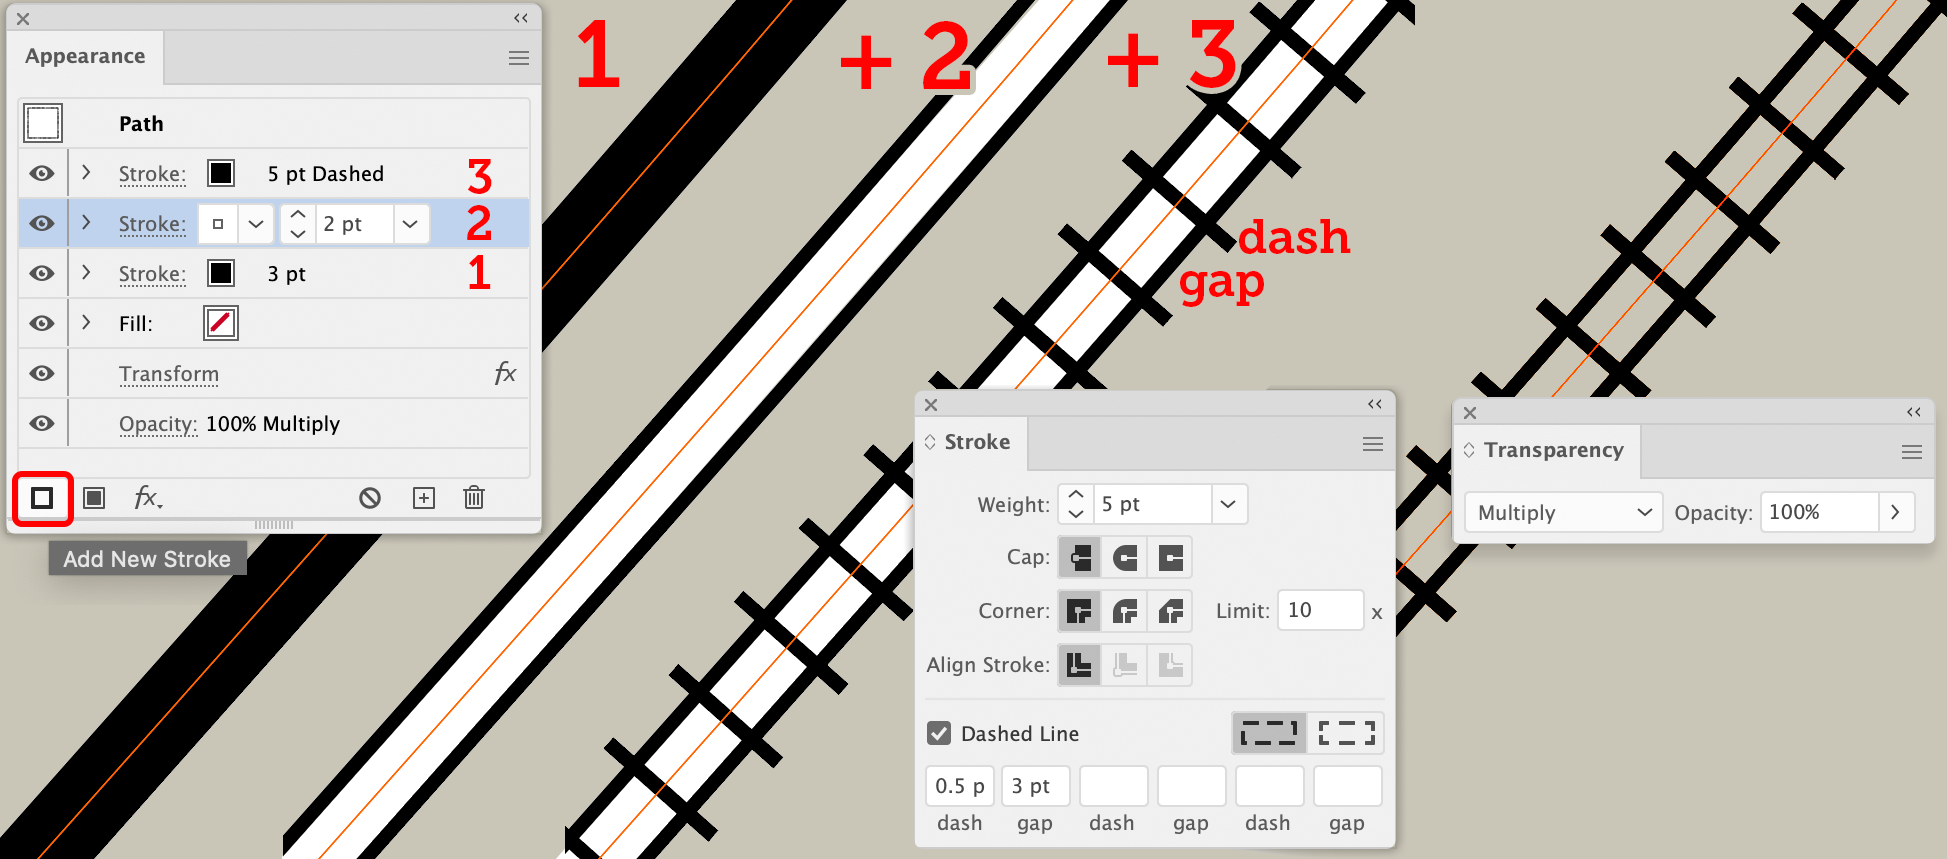
Yes! Any Illustrator path can be given multiple strokes (or fills) with the Appearance panel. Three strokes should do it: a black stroke at the bottom, a thinner white stroke above that, and finally a rather wide dashed stroke with larger gaps between its short dashes (the ties). The first two make the rails (the white hiding the center of the black stroke).

Simply click the Add New Stroke button to create a new stroke. Highlight a stroke to adjust its specific options. I highlighted the top one (3 in the illustration) then gave it the dash rhythm I wanted via the Stroke panel.

To allow the path to be put over any backdrop, I highlighted Path at the top of the Appearance panel and use the Transparency panel set the Blend Mode of the path to Multiply (which keeps black opaque but makes white disappear).

The one tricky bit is making stroke weight adjustments. Normally, we'd have to highlight each stroke then adjust its weight and, in the case of the dashed one, we'd have to alter the size of the gaps and dashes, too. Ugh.

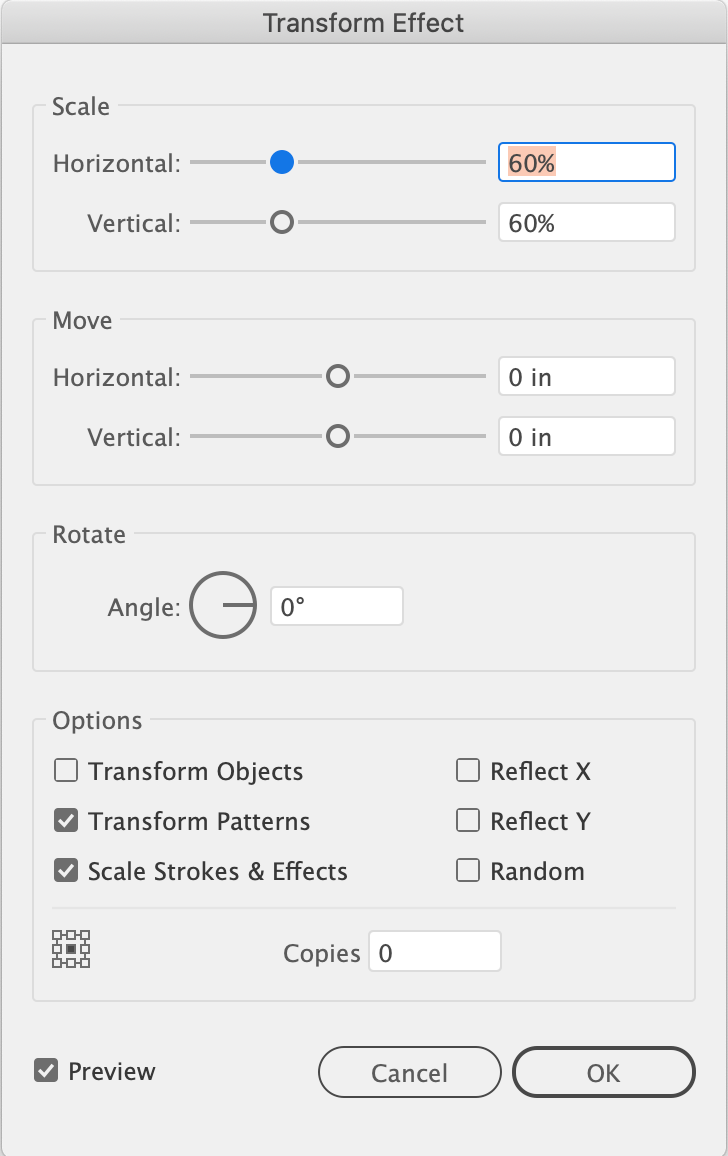
So, with the Path itself targeted, we add a Transform effect (Effect > Distort & Transform > Transform). In that dialog box, make sure to check Scale Strokes & Effects and to uncheck Transform Objects. (It's a long-standing complaint that one can't scale only strokes: for some reason patterns get checked, too. Luckily, that's not a problem in this case.)

Now, any time we need to adjust the overall stroke weight, we can select a railroad track path, double click on its Transform effect in the Appearance panel, then change the Horizontal and Vertical Scale. All the strokes, dashes, and gaps obey!

I use a similar method to create a road path with a center, yellow line (maybe a double yellow) and even multiple lanes (takes quite a few strokes!).

Tip: I'd save this as a Graphic Style if I thought I'd use it again.

calendar policies custom resources faq about cart